Showing posts with label home. Show all posts

Tuesday, 17 January 2017

Saved so much time cooking and the meat so tender

This is my first electric pressure cooker and I could not be more than pleasantly surprised. I was expecting it to be as loud as my conventional pressure cooker. This was quiet until I release the pressure but still not as loud. I also find the 30 minute timer on the pressure cooker mode to be very handy as sometimes, my meat get too tender they break apart just on stirring.

The pressure cooker is also versatile, I have used it as a rice cooker, slow cooker and steamer. It also has a keep warm feature which is very handy for me a when I cook our dinner earlier than normal. I have found this to be very convenient. I have yet to try the other features but so far, I am impressed and would find myself cooking with it all the time.

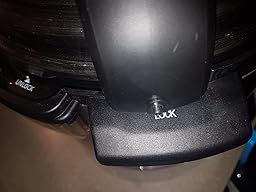
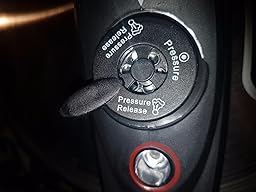
The pressure cooker came with an instruction manual that has a few handy recipes in them, a paddle, measuring cup and a steamer rack. The lid has a very sturdy look to it with nice easy to grip handles. There is also the dials for pressure cooking and quick release of pressure. The lid is also very easy to secure and unlock. I wasn't sure at first but it seems to be stable and stays put.

The front panel is also very easy to operate and seems to be self explanatory to me. The modes of cooking are very handy and has a delay timer too. This have been used in my kitchen almost everyday since I got it.


Tuesday, 10 January 2017

Handy extra storage solution for me and provides easy access too

I have always needed this extra storage in my car. I always find my cup holders to be filled with lots of other things like keys, sweets etc and this will provide me a place to store my other driving essentials without the cup holders overflowing and me ending up too distracted.

This is a set of 2 in a black leatherette outer and has studs on the top. It looks good and fits well in between the chair and the cup holders. I can also easily carry this bit if I need to swap cars. There is no closure on the top which gives me easy access to whatever I store in it. Being a girl, I would put handy facial tissues and wet wipes on it, lip gloss, hand lotion, cable charger, pens and my other bits I find essential for my travels.

I find this very handy, well made, good value for a set of 2 and I would find lots of uses for it.


You can get it from here.

May xx

Tuesday, 11 October 2016

Beautifully made brushes and a delight to use


The set of brushes came boxed prettily and I'm pretty sure these will make a lovely gift to someone. There are 10 different shaped brushes in the set. The brushes has a velvety handle on them which feels nice to the touch and a rose gold tone. The brushes are full and filled with soft fine bristles that actually feels nice across the skin. There are brushes for different applications of makeup.


For the bigger round brushes, I use them for foundation, loose powder and for blusher, contouring and highlighter. The smaller ones I used for concealer, eye shadow, eye liner, eyebrows and for finer contouring. The thinner brushes for eyebrows I had to get used to maneuvering and needs more practice. I think it's because it's a different angle approach but the brush is stiff the way I like it for an eye brow brush so perfect for what I want it to.


The foundation brush and concealer didn't leave me with any streaks so a really good result. I used one of the medium brushes for blending and it did the job well. The brushes are finely made it's really lovely to touch. They are also easy to clean and dries up over night ready to be used again.


I am quite impressed with the quality of these brushes and I think they will last a long time. I haven't seen one fiber shed.


Buy it here

Saturday, 17 September 2016

Great nutrient extractor smoothie maker without costing a limb


Amazing nutrient extractor/blender, I would give it 6 stars if I could


The nutrient extractor came nicely packaged and boxed with lots of accessories with it. The nutrient extractor set consists of the powerful machine, 2 different sized jugs at 600 mls and 350 mls sizes, 2 different steel blades for milling and chopping/blending, spill proof drinking lid on the go, a storage lid to keep the smoothies fresh while kept in the fridge, a lid ring for easy handling and pouring and an instruction manual with bonus recipes. Both the jugs has a rubberized portion to provide a good grip for better handling. The machine itself feels a good weight and looks like a robust machine. The bottom of the machine has rubberized feet that adheres to the worktop which is essential for keeping it in place. The vent is also at the bottom of the machine. It'll be best to read and go through the instruction manual before starting but everything seems pretty straight forward. And yes I do read the manual on occasions. So, the manual says to use the machine at a maximum of 2 minutes every use and let the machine col down again before using it. Because the machine has a strong and powerful machine, it's understandable that a small machine will need a break after every 2 minutes. To be fair, I was not sure about it at first but when I actually started making our smoothies, it literally took less than 5 seconds to make it! Yay! The first time I made the smoothies, I made 4 different varieties. It took about 5 seconds for each and so 2 minutes is a long time and a lot of smoothies before it needs a break. I did use fruits only the first time. The second time, I added some vanilla ice cream to the fruits to give it a milkshake edge to it and that went faster than it was made! Suffice to say that this is my whole family's favorite machine at the moment and is sat on the counter top not taking too much space but getting a lot of attention. Hence the 6 stars rating if I could. Also, the jugs are so easy to clean. In between use, I just rinsed it with water and it was ready to use again. When done, it was easy to clean with hot and soapy water. I haven't tried it on the dish washer but honestly, it took another 5 seconds to clean. Amazing!

The instruction manual has a few recipes at the back. I just bought our favorite fruits and blended it. I made different combinations using bananas, strawberries, blueberries, raspberries and pineapple with a little bit of water. You might want to either freeze your fruits first so it will be cold when you blend it or you can put in a few ice cubes with the fruits. With the fruit milkshake, I added vanilla ice cream with the fruits and they lapped it up! I can only imagine if I started using chocolate in with it!

The great thing about this machine is that you can also use it for milling. The 2 blade cap is for milling coffee beans, grains, nuts or for herbs. You can use the milling attachment for making your custom nut and seed protein mix which you can add onto your smoothies for the added oomph. You can also mill some of your customized spices together for steak rubs and seasonings. Chilli and sea salt with garlic combo and other recipes which you easily google. The possibilities are endless! The 6 prong blade is for the nutrient extractor for blasting through the fruit and getting all the nutrients from every part of the fruit you blend.

So for all of these, the price is an additional positive as it's a lot cheaper than the famous alternative. This machine is sturdy and robust. It's quality made and delivers efficiently. Ugh, I cannot gush enough about it so I definitely and highly recommend this nutrient extractor multi function machine.


You can buy it here.. and let me know how you love it!

Sunday, 31 March 2013

Gumball for Easter!

Happy Easter everyone!
We have been blessed today to welcome the newest member of our little family..
I'd like you all to meet Gumball.


He purrs a lot and now getting used to the bucket loads of attention!
We are all very much in love!

I'm hoping to post a little tut tomorrow once Gumball has settled and decides to stop 
walking all over the keyboard!


Friday, 18 January 2013

Crystal SLiding Knot Bracelet, Shoe Clip Upcycle and More Snow!

It has snowed all night and all morning. Kids were taken to school because no announcement of school closure was made but now, the school is closing. At least an hour and a half later than the high school ones.
Our street looks scary to drive on.
But I hear the main roads are okay so you guys driving out there, be careful!


Brynn went out to pick the children up bringing a shovel with him.
And yes that's our backyard.

So while I watch the flurries fall, I made this Crystal Sliding Knot. It literally took less than 5 minutes. You can find a Sliding Knot Tutorial from here. It's full of pictures to help you make it out.
I just used a simple crystal bead with loops on both ends. 

I think I left the end bits to long so when it was time to burn it off to keep it from fraying, it turned out like that! Oh well, I think for a first time, I can't be too hard on myself ;-)

And because the bracelet didn't take that long, I thought I'd fix the embellished bow that used to be attached to my shoes but has decided to fall off.

To fix it, I stitched a pair of shoe clips at the back of the bow.
I can then use it to embellish another shoe if and when I want to!
Yey!

It was originally placed on the middle of the toes but for a change, you can put it on the side or even near the heel part.

I like reusing stuff specially ones that are as cute as these. Thinking back, they were the reason I bought the shoes. They are very pretty.

What are you doing today?
Take care and keep warm!


Tuesday, 18 December 2012

Fabulous Mirror Redo DIY!

I bought this gigantic mirror second hand online... It has been preloved for nearly 30 years by the previous owners and they were kinda sad it was going.. I promised I will look after it and put it in a place where it will be appreciated and loved too!
This is how it looked like when I bought it..

I'm not entirely sure about the color of this frame but the previous owners said it was silver which was the second reason I chose it. Well, from where I'm standing, it doesn't look silver at all. It looks gold or coppery with black gilt or something? Anyway, I looked at the back and ho! and behold! the paint was silver! So I guess this is just yellowing or they have never cleaned the poor thing.... So as you can see at the bottom, I got my cleaning tools out (unused old travel toothbrush and lukewarm water) to start with...


and then gave up after 4 hours of brushing. I did manage to get through the frame. Some parts did clean up silver, some parts didn't. That is after trying out nail polish remover & dishwasher liquid! But nope, the grime won't budge in places! Grrrrr!

So, I ordered a shiny silver spray paint and also a primer.. and a sealant...
I think she looks pretty silvered up as she's supposed to...
What do you think?


She resides in our Dining Room where it's supposed to be clear and tidy but when it's made into a substitute craft/sewing room... well, I guess I don't have to point out my mess on the table... ;)
Enjoy your DIYing! I love it!


Tuesday, 27 November 2012

Glitter and Sequins Shoes Mother & Daughter DIY

A couple of months ago, I bought a pair of bright pink shoes. Not that there is anything wrong with the color, it just wouldn't be my first choice. I bought it because it was on sale and I had this DIY in mind.
I also bought a pair of plain black mary janes for Ashley (on sale of course, £4 to be exact).
Glittered and sequined shoes!


My shoes turned out really glittery and very pretty. But disaster struck Ashley's pair.
Sadly, it wasn't possible to buy real leather brand new shoes for £4 and so, when I peeled off the painter's tape off, bits came with it :(
To remedy this, I tried Sharpie. It wasn't enough to cover the peeling so this is where the sequin trim came in! And as per Ashley's request, pink bows were added too!


 Ashley is delighted with her shoes! 
They are not wearing a uniform today for charity in her school and she couldn't be more excited to go to school to show off her glittery shoes! I think that's a result I cannot be happier with. I'm just going to see if the shoes has survived a day in school!

Right, this is a project that Ashley and I did together. She glitterized and I did mine. I applied the painter's tape only on the toe bit of my shoes and the inside of only 1 shoe (I got too excited to start with glitters!) and applied it all over the trim of Ashley's.
This is all we used: Mod Podge, glitter of your choice, a plastic container and brush. I must say the tape is optional. Tape anywhere you don't want the glitter in.


Mix equal parts of glitter and Mod Podge. I applied about 1 coat of the mix. I then sprinkled glitter like crazy all over the shoes. I left it to dry and applied a coat of Mod Podge on it own as a sealant. 


You can put some more glitter where it's needed, then seal it with a coat of Mod Podge again..


Enjoy your new sparkling shoes and wear with pride. I must say, I am very pleased with mine and I will  certainly be doing this on some flats!


Monday, 26 November 2012

Make a Rag Rug!

I saw this blog and I can totally relate to their blog title: Craftaholics Anonymous! :D

Like me (and maybe you too!) they love crafting and diy.

They featured a Diy Handmade Rag Rug Tutorial by Jaime of Everyday Art 


Adorable! Something to make with all those scrap fabric and old clothes! 
I hope you all had a fab weekend!


Monday, 19 November 2012

Vintage Chanel Necklace DIY Tutorial

I got my first ever comment the other day from Carolina of ArtistSpirit requesting the tutorial for the Vintage Chanel Necklace worn by Caroline Channing of 2 Broke Girls!

And as promised, if you'd like to know how I did it, I said I'll write it up and so here it is!

Materials:

20x 16mm white pearls
20x 14mm white pearls
2x 4mm white pearls

Gold curb chain:
1x 16 inches (adjust as needed)
1x 8inches
1x extension chain (if you feel you'll need it to adjust the drop)

20 x 20mm headpins 
20 x gold seed beeds (I only have a really thin set of headpins and the pearls has 1mm hole so had to use this to stop it from falling through)
20 x gold bead spacer
20 x 40mm long 0.8mm gold wire 
Jumprings
Lobster clasp

Tools:
Wire cutters
Round end pliers
Pliers


Insert the seed bead and bead spacer in the head pin followed by the 14mm pearls then make a small loop at the end

 With the 40mm wire, make a small loop at one end, insert the 16mm pearls and make another bigger loop at the end and it should look like this. Make sure your bigger loop will actually fit in the chain you'll be using.


 Connect the 2 pearls you've put together by attaching them through the loops you've made. This is how it should look like


 Assemble your chain. Attach the 8inch chain to the 16 inch chain using jumprings. Make sure they're in the middle with a bit of slack. The top pearls will be going on top of each other if there's no slack. So it should look like this:


 Attach your dangling pearls spreading them evenly through out the chain.


Attach your lobster clasp using a jump ring at one end of the chain.
I've put several jump rings at the end so it could adjust the drop a little bit higher or lower depending on the need. I've also put 2 little pearls at the end so it looks a bit more finished. :)


My model Ashley patiently sat and waited while I put on the pearls all the while making her appreciative comments on how pretty it was becoming.


Adjust the spread accordingly. I had 2-3 links in between the pearls
And hopefully you'll get this:


 Enjoy and wear with pride!
I hope you like it, shout out if you do!